As outlined on the previous page, it is possible for the "Do-It-Yourselfer" to purchase a CCM with the proper firmware ID from eBay or an auto parts recycler. The next step, as described below, requires some effort to remove the defunct CCM and install the replacement unit.
After removing and replacing your CCM, some electronics knowledge will be required to either completely bypass the Vehicle Anti-Theft System (VATS) or to discover the Pass-Key Code that is already stored in the replacement CCM, and subsequently purchase a new key, cut to your existing ignition cylinder lock, with a resistive pellet value that matches this Pass-Key Code.
Alternatively, it is possible to purchase a CCM from a reseller, including ZR1ECM.com, that comes pre-programmed with your Vehicle Specific data, including Engine and Transmission type, Options, VIN, Mileage and existing Pass-Key Code. See the YouTube Video here.
1990 - 1996 CORVETTE: Central Control Module
Removal and ReinstallationThe CCM is strategically placed in the middle of the dashboard a few inches behind the radio control head, but is only accessible from the driver's footwell. While this out-of-the-way location makes it time-consuming to replace a CCM, this added level of difficulty provides a significant layer of protection against drive-away theft.
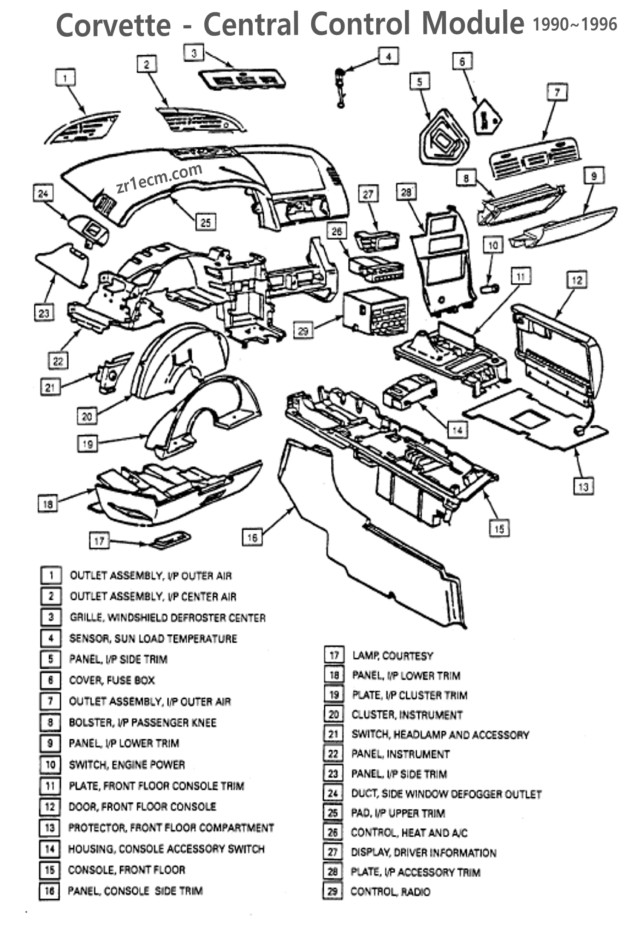
To gain access to the CCM without damaging the vehicle's interior, the driver's seat should be removed along with the carpeted trim on the left side of the center console and a number of lower instrument panel components. For an illustration click here.
The driver's seat is secured with four x 13mm hex nuts. The bolt on the latch-side of the driver's seatbelt requires a Torx T47 or T50 socket to remove or install it. The Snap-on GFTX500E is recommended.
The driver's door should be fully open when working to remove or replace the various screws from the foot bezel to the right of the accelerator pedal, the black trim panel located beside and behind the headlight switch and the semi-carpeted under-dash panel. The heads of the screws installed in this area will either be Phillips, Torx or 7mm hex. One plastic press-clip might be used on the foot bezel. For an illustration click here.
To completely remove the under-dash panel, it will be necessary to disconnect the electrical plug to the courtesy light and to unscrew the OBD/ALDL/DLC connector. The hood release handle can be pulled and then easily moved through its designated opening.
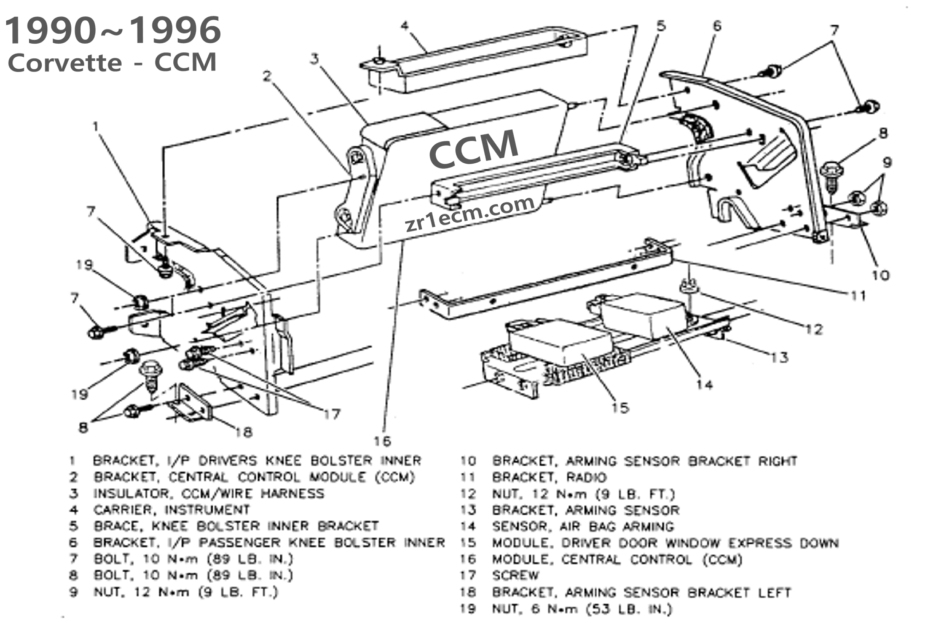
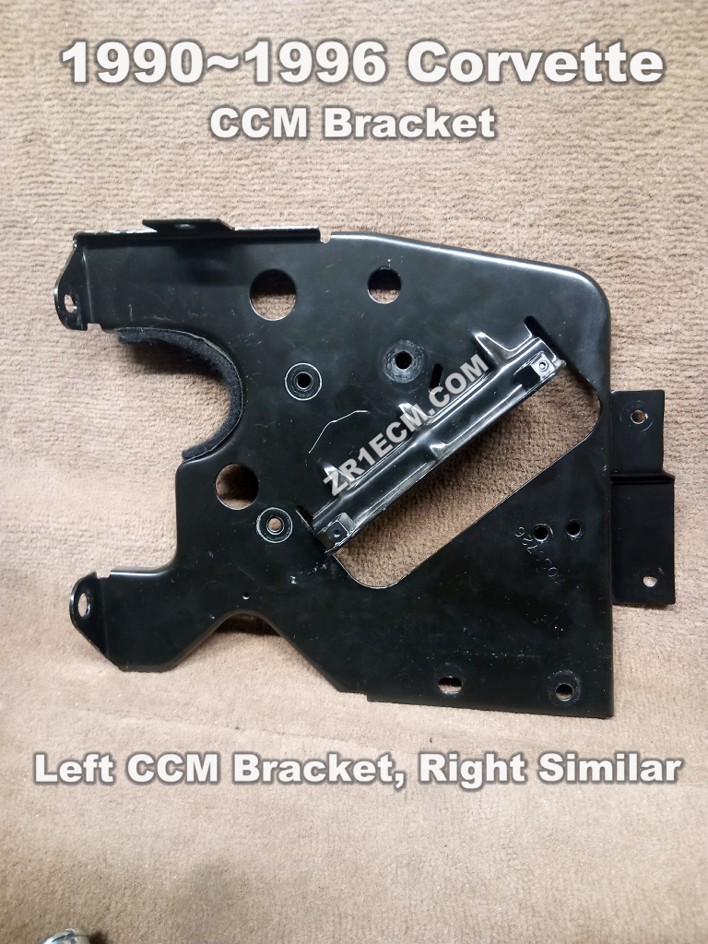
Once the outer trim panels are fully removed, the driver's metal knee bolster should be removed followed by the left CCM bracket. To see a photo click here. These pieces are mounted with bolts that utilize 10mm hex heads. These bolts are easily broken, so it is important not to overtighten them when reinstalling the CCM bracket. For an illustration click here.
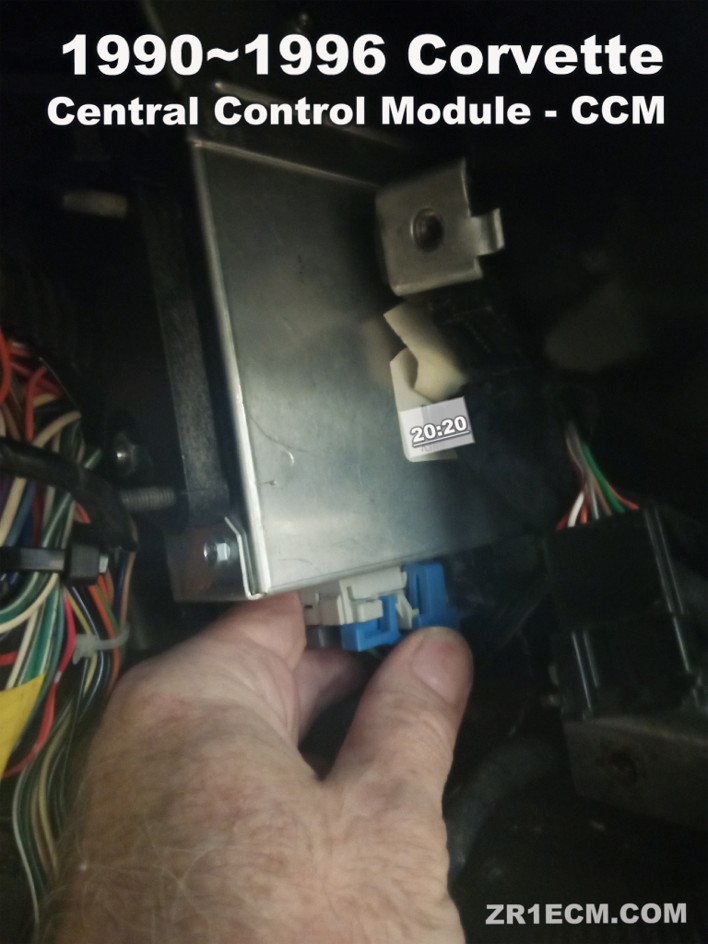
The CCM is enclosed in an aluminum box with dimensions of 8.5 x 6 x 1.5 inches. There are two 32-pin connectors under the unit. To remove the CCM, it will be necessary to gently pull it toward the driver footwell a few inches so as to remove its first connector, then a few more inches to remove its second connector. To see a photo click here. This gradual approach will be required because the wiring harness does not offer much slack. To avoid damaging the CCM's wiring or its connectors, it is best to depress the connector's retention tab then wiggle each plug left and right while pulling it down and outward. For an illustration click here.
When the CCM is disconnected, the Corvette cannot be started since the Vehicle Anti-Theft System will be rendered inoperable. Even if the VATS is bypassed, most of the instrument cluster, including the speedometer, will not function without a properly working CCM.
1990 - 1996 CORVETTE Central Control Module
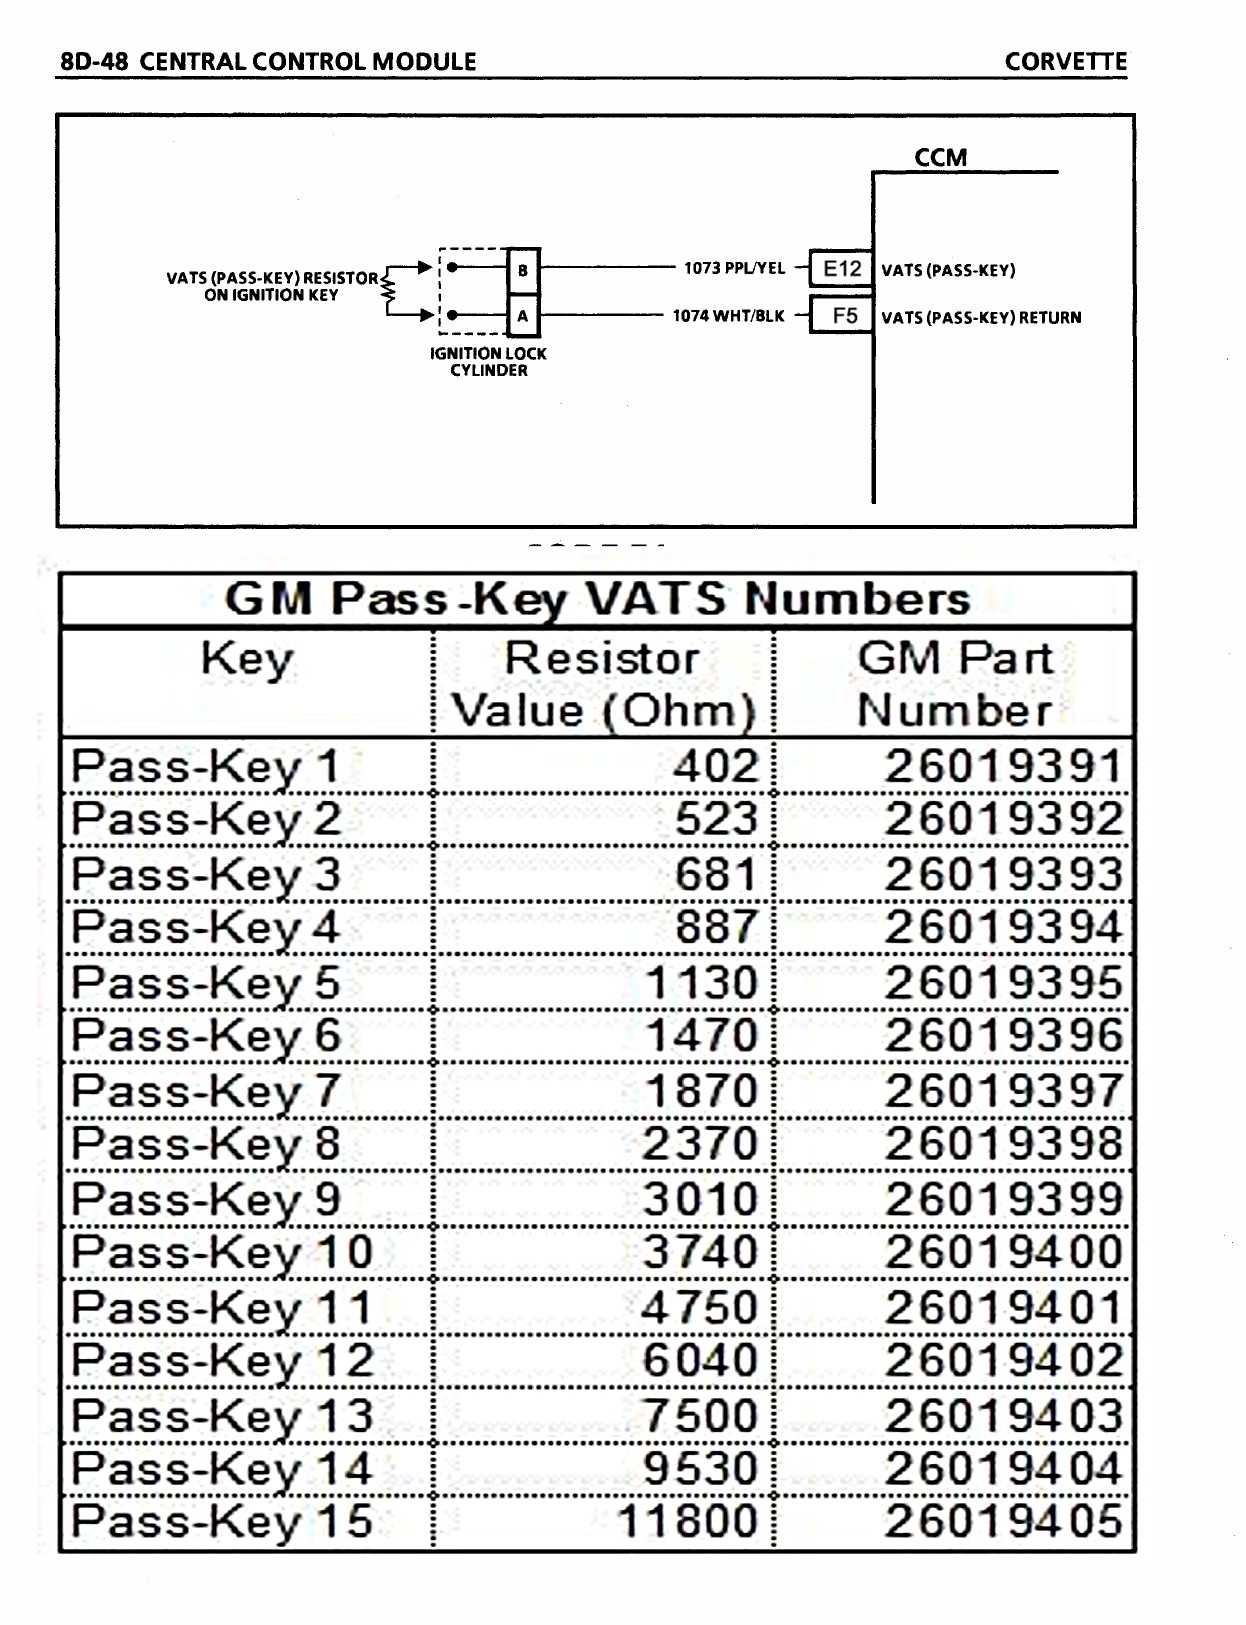
Vehicle Anti-Theft System Pass-Key CodeThere are 15 possible key codes used in the GM Pass-Key ll system used in the 1990-1996 Corvette. Each code corresponds to the electrical resistance of a pellet that is embedded in the shaft of the Corvette's ignition key. For the Pass Key ll Chart click here.
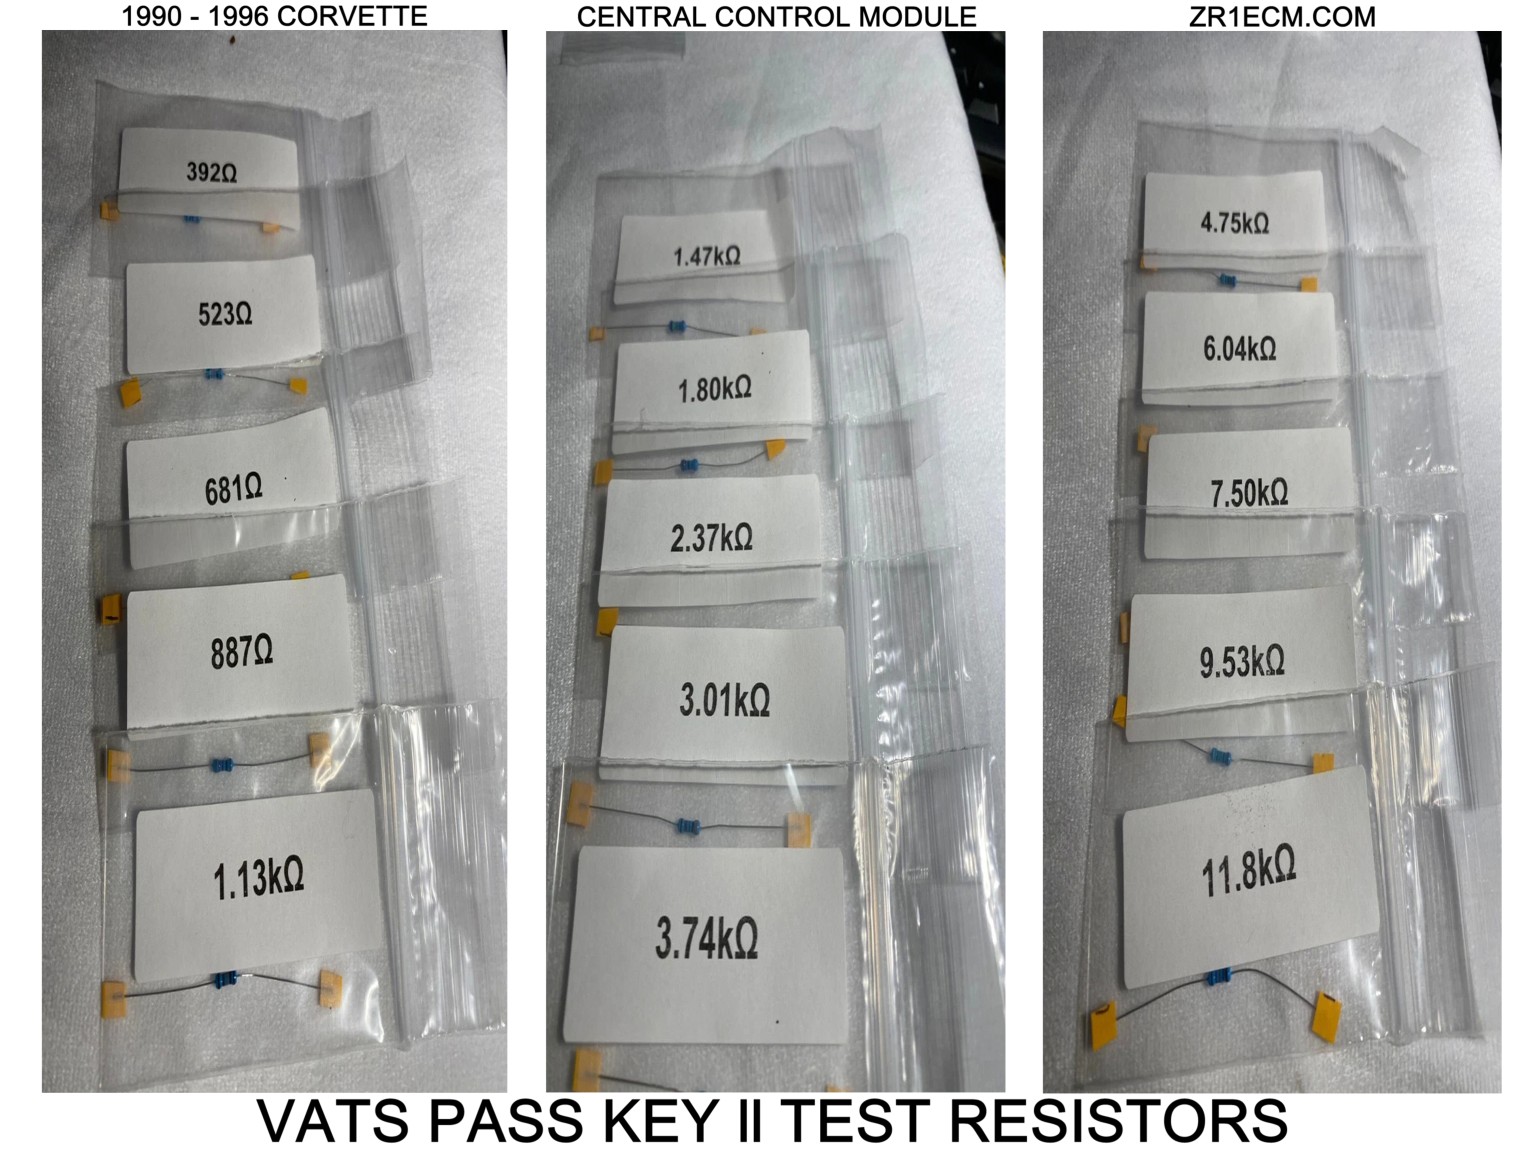
It is possible to purchase online, a package of high-tolerance resistors to test, one at a time, for the matching resistive pellet that will be recognized by the previously used CCM. After confirming the proper resistor, this resistor can be soldered in permanently to defeat the VATS or its value can be used to purchase a proper ignition key. For an example of VATS Pass Key ll Test Resistors click here.
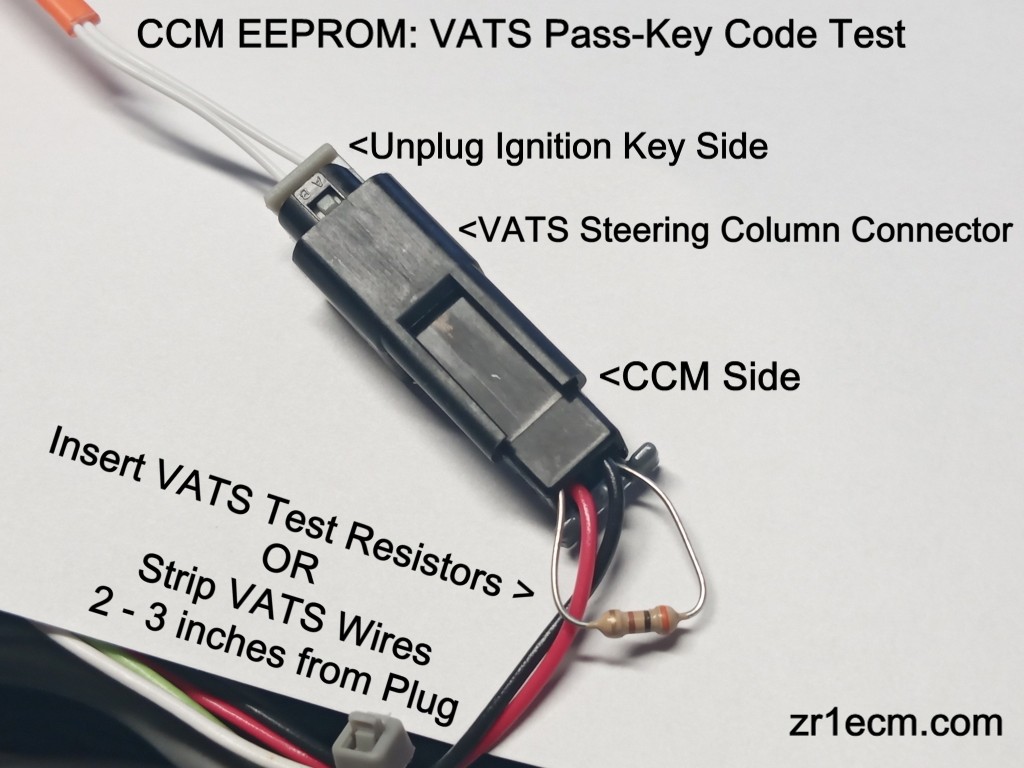
To test each resistor, until you discover the correct one, it will be necessary to unplug the orange colored wire which travels from the ignition lock alongside the steering column. A small VATS Connector exists 12 - 18 inches away from the ignition cylinder. The portion of this wire that travels to the CCM can be used for testing the resistors.
The CCM side of the VATS wiring provides a 2-pin plug which readily accommodates the placement of the resistor leads at the rear of its terminals. Alternatively, it is possible to cut and strip the two VATS wires a few inches beyond the connector and wrap the test resistor leads around each wire. The VATS wires can be soldered back in place after testing is completed or, if VATS is to be disabled, the matching resistor can be permanently soldered here. After soldering, be sure to use shrink-tubing or multiple layers of electrical tape to protect these wires. For a photo of the VATS Connector click here.
If your Corvette is a 1990 model year, after installing the first resistor, wait ten minutes with the ignition key turned to "OFF", then proceed to turn the key forward to "ON". If the "SECURITY" telltale bulb in the cluster illuminates and stays solid, this resistor is not the correct value. Turn the key "OFF" and install the next resistor. Wait ten minutes and turn the Key to "ON" again. When the correct value resistor is discovered the "SECURITY" telltale will flash or stay off and it will be possible to start the car.
If your Corvette is a 1991 thru 1996 model year, after installing the first resistor, wait four minutes with the ignition key turned to "OFF", then proceed to turn the key forward to "ON". If the "SECURITY" telltale bulb in the cluster illuminates and stays solid, this resistor is not the correct value. Turn the key "OFF" and install the next resistor. Wait four minutes and turn the Key to "ON" again. When the correct value resistor is discovered the "SECURITY" telltale will flash or stay off and it will be possible to start the car.
NOTE: ZR1ECM provides VATS Elimination PROM Chips, which can be purchased standalone if you have the soldering skills required to remove the old PROM and replace it. If you prefer, you can send your CCM to us and we can install the VATS Elimination PROM or you can purchase a ready-for-use refurbished CCM from us. For more information, see the CCM FAQ click here!
Tag: C4, Corvette, ZR1, LT5, ECM, DIS, LT1, LT4, CCM, BCM, VATS, Pass-Key


